
Self-Hosting n8n with AI Assistant: The Production Setup Guide
 Yulei Chen
This guide takes you from fresh accounts to a self-hosted n8n instance with its new AI Assistant. We'll deploy the Sliplane n8n preset, connect Sliplane Managed PostgreSQL, and add Daytona sandboxes, Melious inference, and Brave Search.
The result is a single n8n instance with HTTPS, persistent storage, a database recovery path, and an assistant that can build workflows and search the web. For the reasons behind these choices, costs, and availability tradeoffs, read n8n with AI Assistant: The Production Stack We'd Choose.
AI Assistant is in Preview. n8n currently lists self-hosted Community, Registered Community, and Business support; check its setup guide for your edition.
The setup at a glance
Here's what we'll set up and what you'll need from each service. The steps below cover account creation and configuration for all five components.
| Component | Service | What it does | What you'll configure |
|---|---|---|---|
| n8n hosting | Sliplane n8n preset | Runs n8n with HTTPS and persistent storage | App server, public URL, and encryption key |
| Application database | Sliplane Managed PostgreSQL | Stores workflows, encrypted credentials, and execution data | Connection details, IP allowlist, and TLS certificate |
| Assistant sandbox | Daytona | Provides workspaces for building and validating workflows | API key and sandbox settings |
| Model inference | Melious | Runs the model behind the assistant | API key, model ID, and API base URL |
| Web research | Brave Search API | Lets the assistant search for current information | Search plan and API key |
1. Create your Sliplane account and server
Open Sliplane, click Dashboard, and choose Login with GitHub. Your first login creates your Sliplane account.
Create a project called n8n-production. In Sliplane, a project groups your services, while a server provides the CPU, memory, and storage they use.
Under Servers, choose Create Server, select a region, and pick a server size. Start with at least 2 GB RAM for this walkthrough, then adjust to your workload. Use a paid server for the instance you intend to keep running. Sliplane's demo servers are temporary and expire after 48 hours. See the account quickstart and server setup guide.
2. Create a Sliplane managed database
The n8n preset gives you a persistent n8n container. It doesn't automatically configure PostgreSQL as n8n's database.
In the Sliplane dashboard, open Databases → Create Database. Name it n8n-production-db, choose a region close to your n8n app server, and select its compute and storage size. Click Create Database and wait for provisioning to finish. Follow the managed database quickstart.
Open the database's connection details and save these five values:
- Host
- Port
- Database name
- User
- Password
Use the connection details shown in the dashboard. The database name can differ from the display name you chose, and the port may differ from PostgreSQL's usual 5432.
3. Deploy the n8n preset
Open the preset directly:
 Deploy n8n >
Or return to your n8n-production project, click Deploy Service, select the app server from Step 1, and choose Add service → n8n.
Name the service n8n-production and leave Expose Service enabled. Keep the preset's startup command and port configuration.
Check two settings before deployment:
- A persistent volume is attached at
/home/node/.n8n. N8N_ENCRYPTION_KEYhas a generated value. Save that value securely and keep it unchanged across redeployments.
The current preset supplies both. The volume survives container replacement; the encryption key lets n8n decrypt saved credentials. See Sliplane volumes and n8n hosting practices.
Keep an explicit n8n image version. The preset configuration reviewed for this guide uses docker.io/n8nio/n8n:2.35.7; the live preset may be newer. Record the version you deploy so future updates are deliberate.
Connect n8n to PostgreSQL
In the n8n service's Environment Variables section, click From .env file to add variables in bulk. In the dialog, keep the existing entries and paste the block below on new lines. Replace all five placeholders with the database details from Step 2.
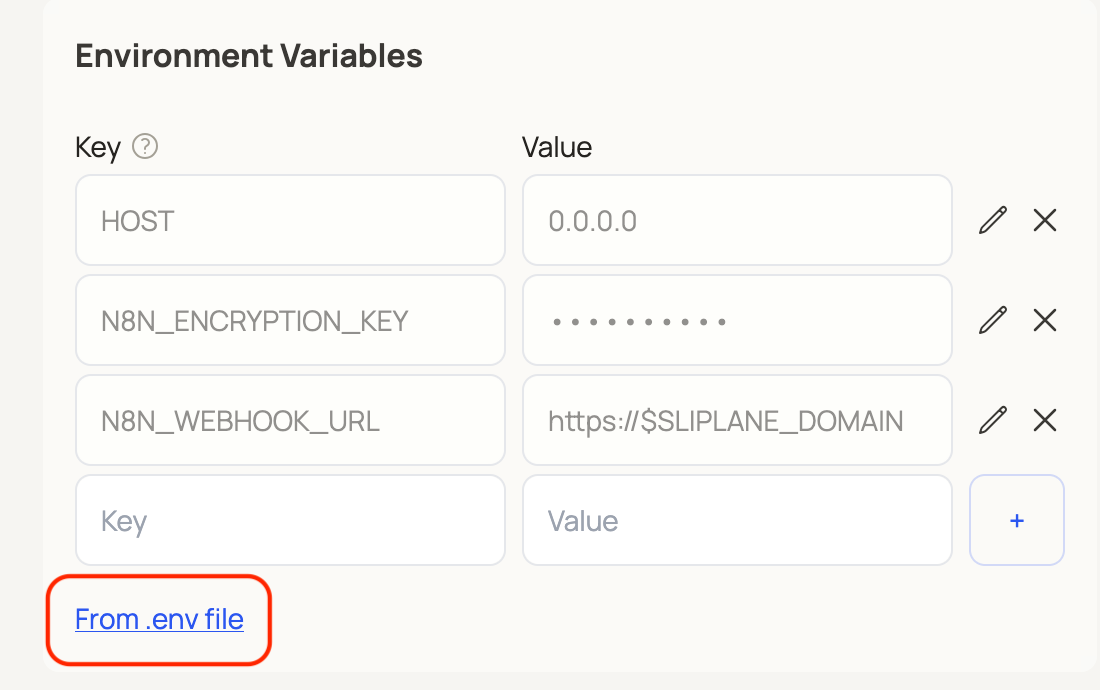
DB_TYPE=postgresdb
DB_POSTGRESDB_HOST=REPLACE_WITH_DATABASE_HOST
DB_POSTGRESDB_PORT=REPLACE_WITH_DATABASE_PORT
DB_POSTGRESDB_DATABASE=REPLACE_WITH_DATABASE_NAME
DB_POSTGRESDB_USER=REPLACE_WITH_POSTGRES_USER
DB_POSTGRESDB_PASSWORD=REPLACE_WITH_POSTGRES_PASSWORD
DB_POSTGRESDB_SSL_ENABLED=true
DB_POSTGRESDB_SSL_REJECT_UNAUTHORIZED=true
Enter the hostname without https:// or a port suffix. Use the password from its individual dashboard field, and mark it as secret.
On first startup, n8n creates its application tables. Configure the connection before creating your owner account or workflows: changing from SQLite to PostgreSQL later does not automatically transfer existing data. See n8n's PostgreSQL setup.
4. Create a Daytona account and API key
Open the Daytona dashboard and complete signup. Finish email verification if prompted, then check your organization and its available credit in Wallet. Daytona currently advertises $200 in free compute credit without a credit card; check the credit's expiration in your account.
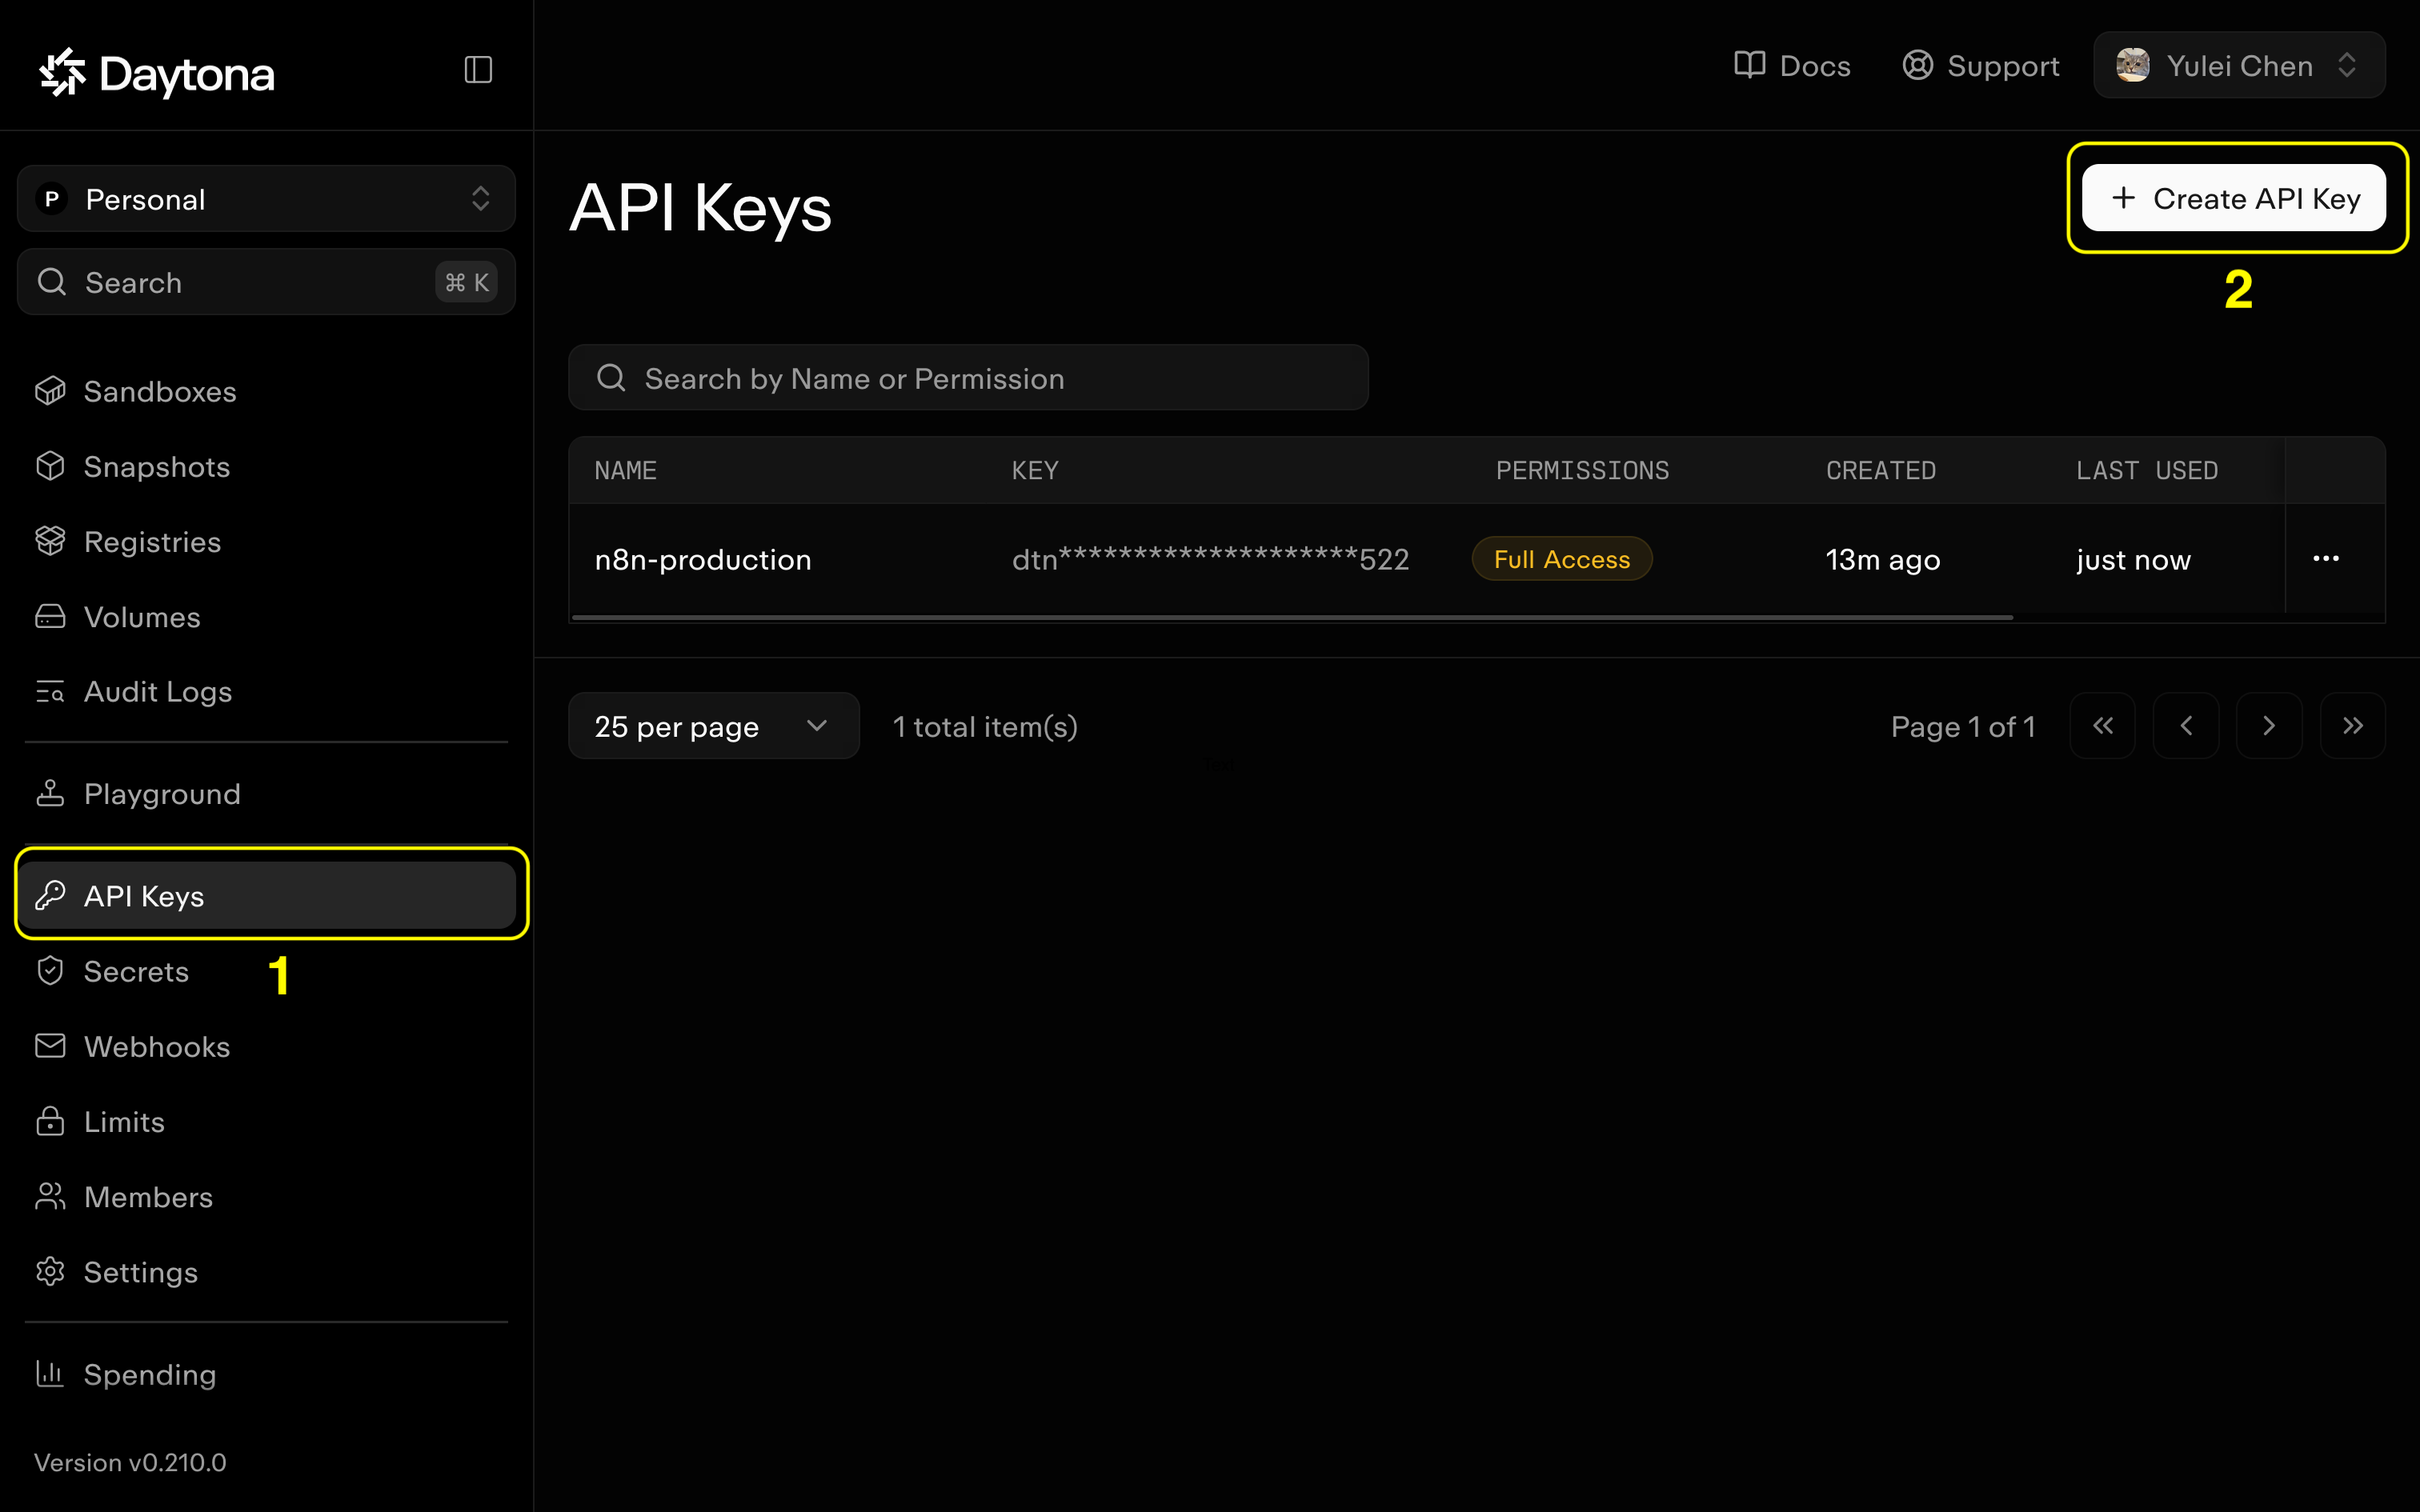
Open API Keys and click Create Key. Name it n8n-production, choose an expiration date you can manage, and give it permissions to create and modify sandboxes and snapshots, and to delete sandboxes. These permissions cover provisioning the builder's workspace and cleaning it up afterward. Copy the generated key into your password manager. Daytona lists the available permissions in its API key documentation.
We'll supply this key to n8n. It will create the required sandboxes when the assistant needs them.
For ongoing use, check your wallet balance and resource limits. Free compute credit and resource quotas are different: an account can have credit remaining and still reach its sandbox capacity. See Daytona limits.
5. Create a Brave Search API account
Open the Brave Search API dashboard and sign up. Complete the email verification, then activate the Search plan.
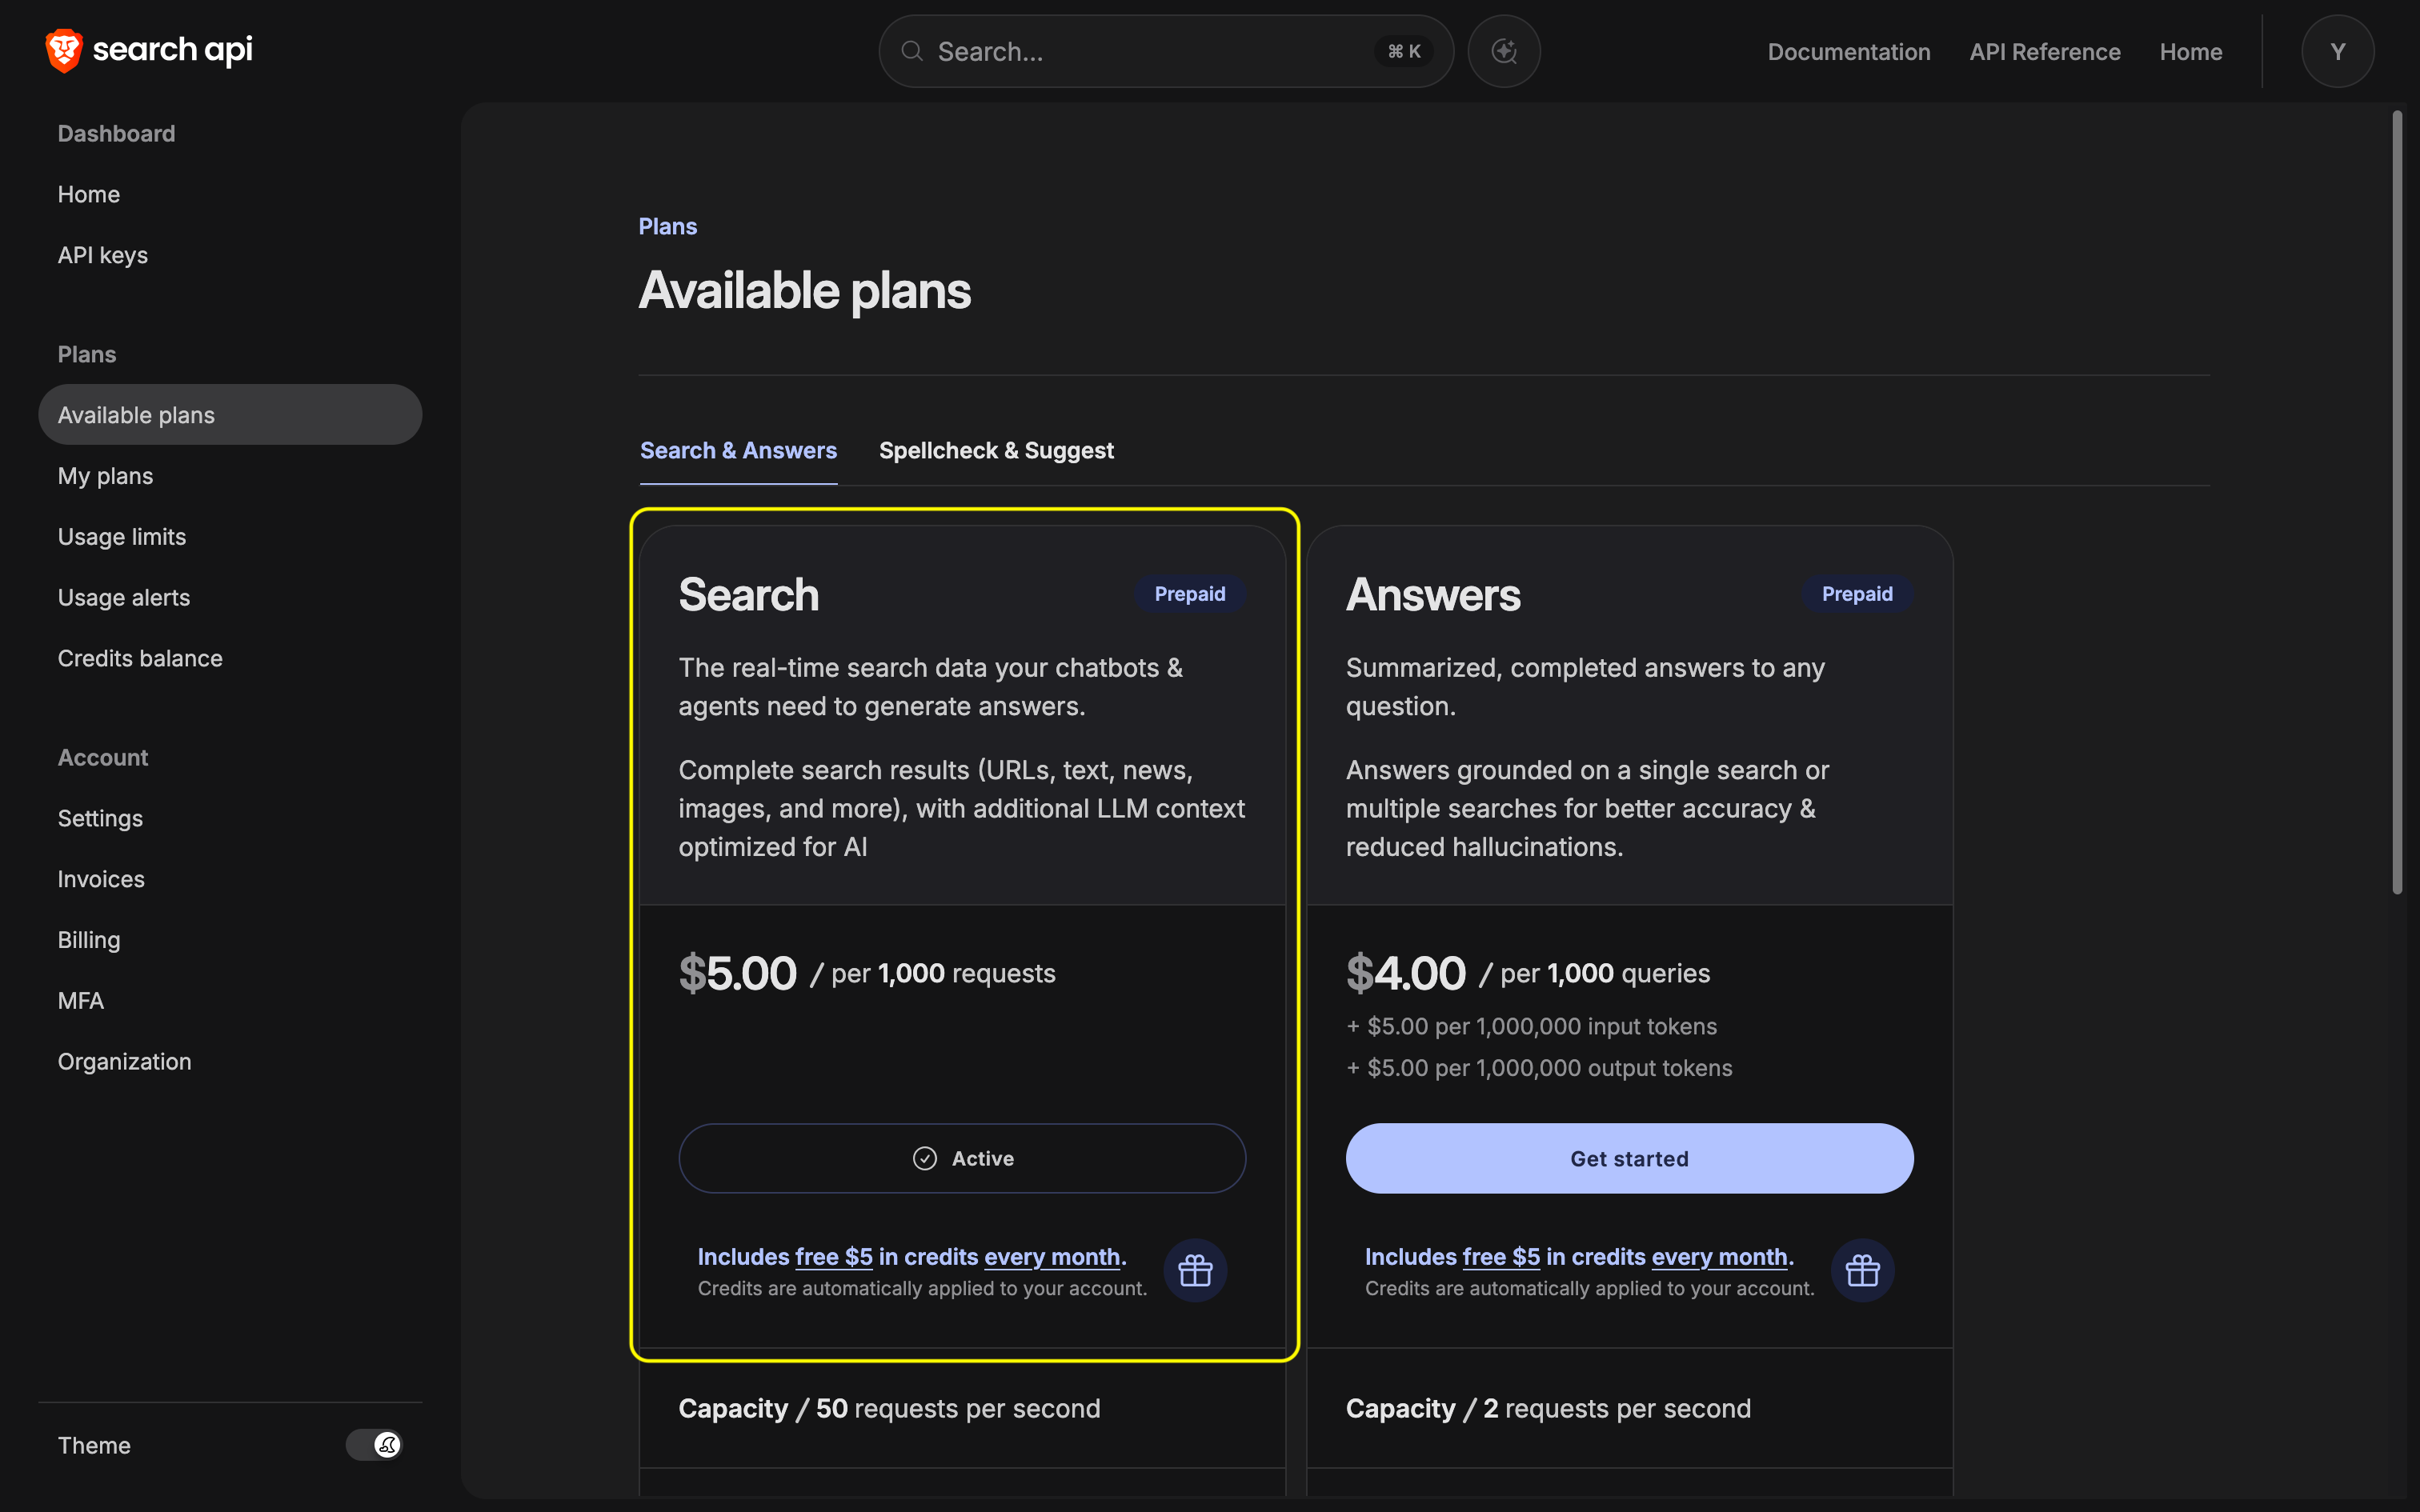
Brave requires a payment card to activate the plan. To start with only the monthly free credit, set the prepaid amount to $0 and leave automatic reload disabled. Once the plan is active, open API Keys, create a key for that Search plan, and save it as n8n-production in your password manager.
The $5 free credit renews monthly and unused free credit doesn't roll over. If you exhaust the credit and have no prepaid balance, searches pause. For ongoing use, fund the account and set a spending limit that fits your budget. These details are covered in Brave's account and billing FAQ.
6. Set up inference with Melious
Open Melious and create an account. Choose pay-as-you-go inference and add credit as needed for your initial tests. Review the selected model's input and output prices before topping up.
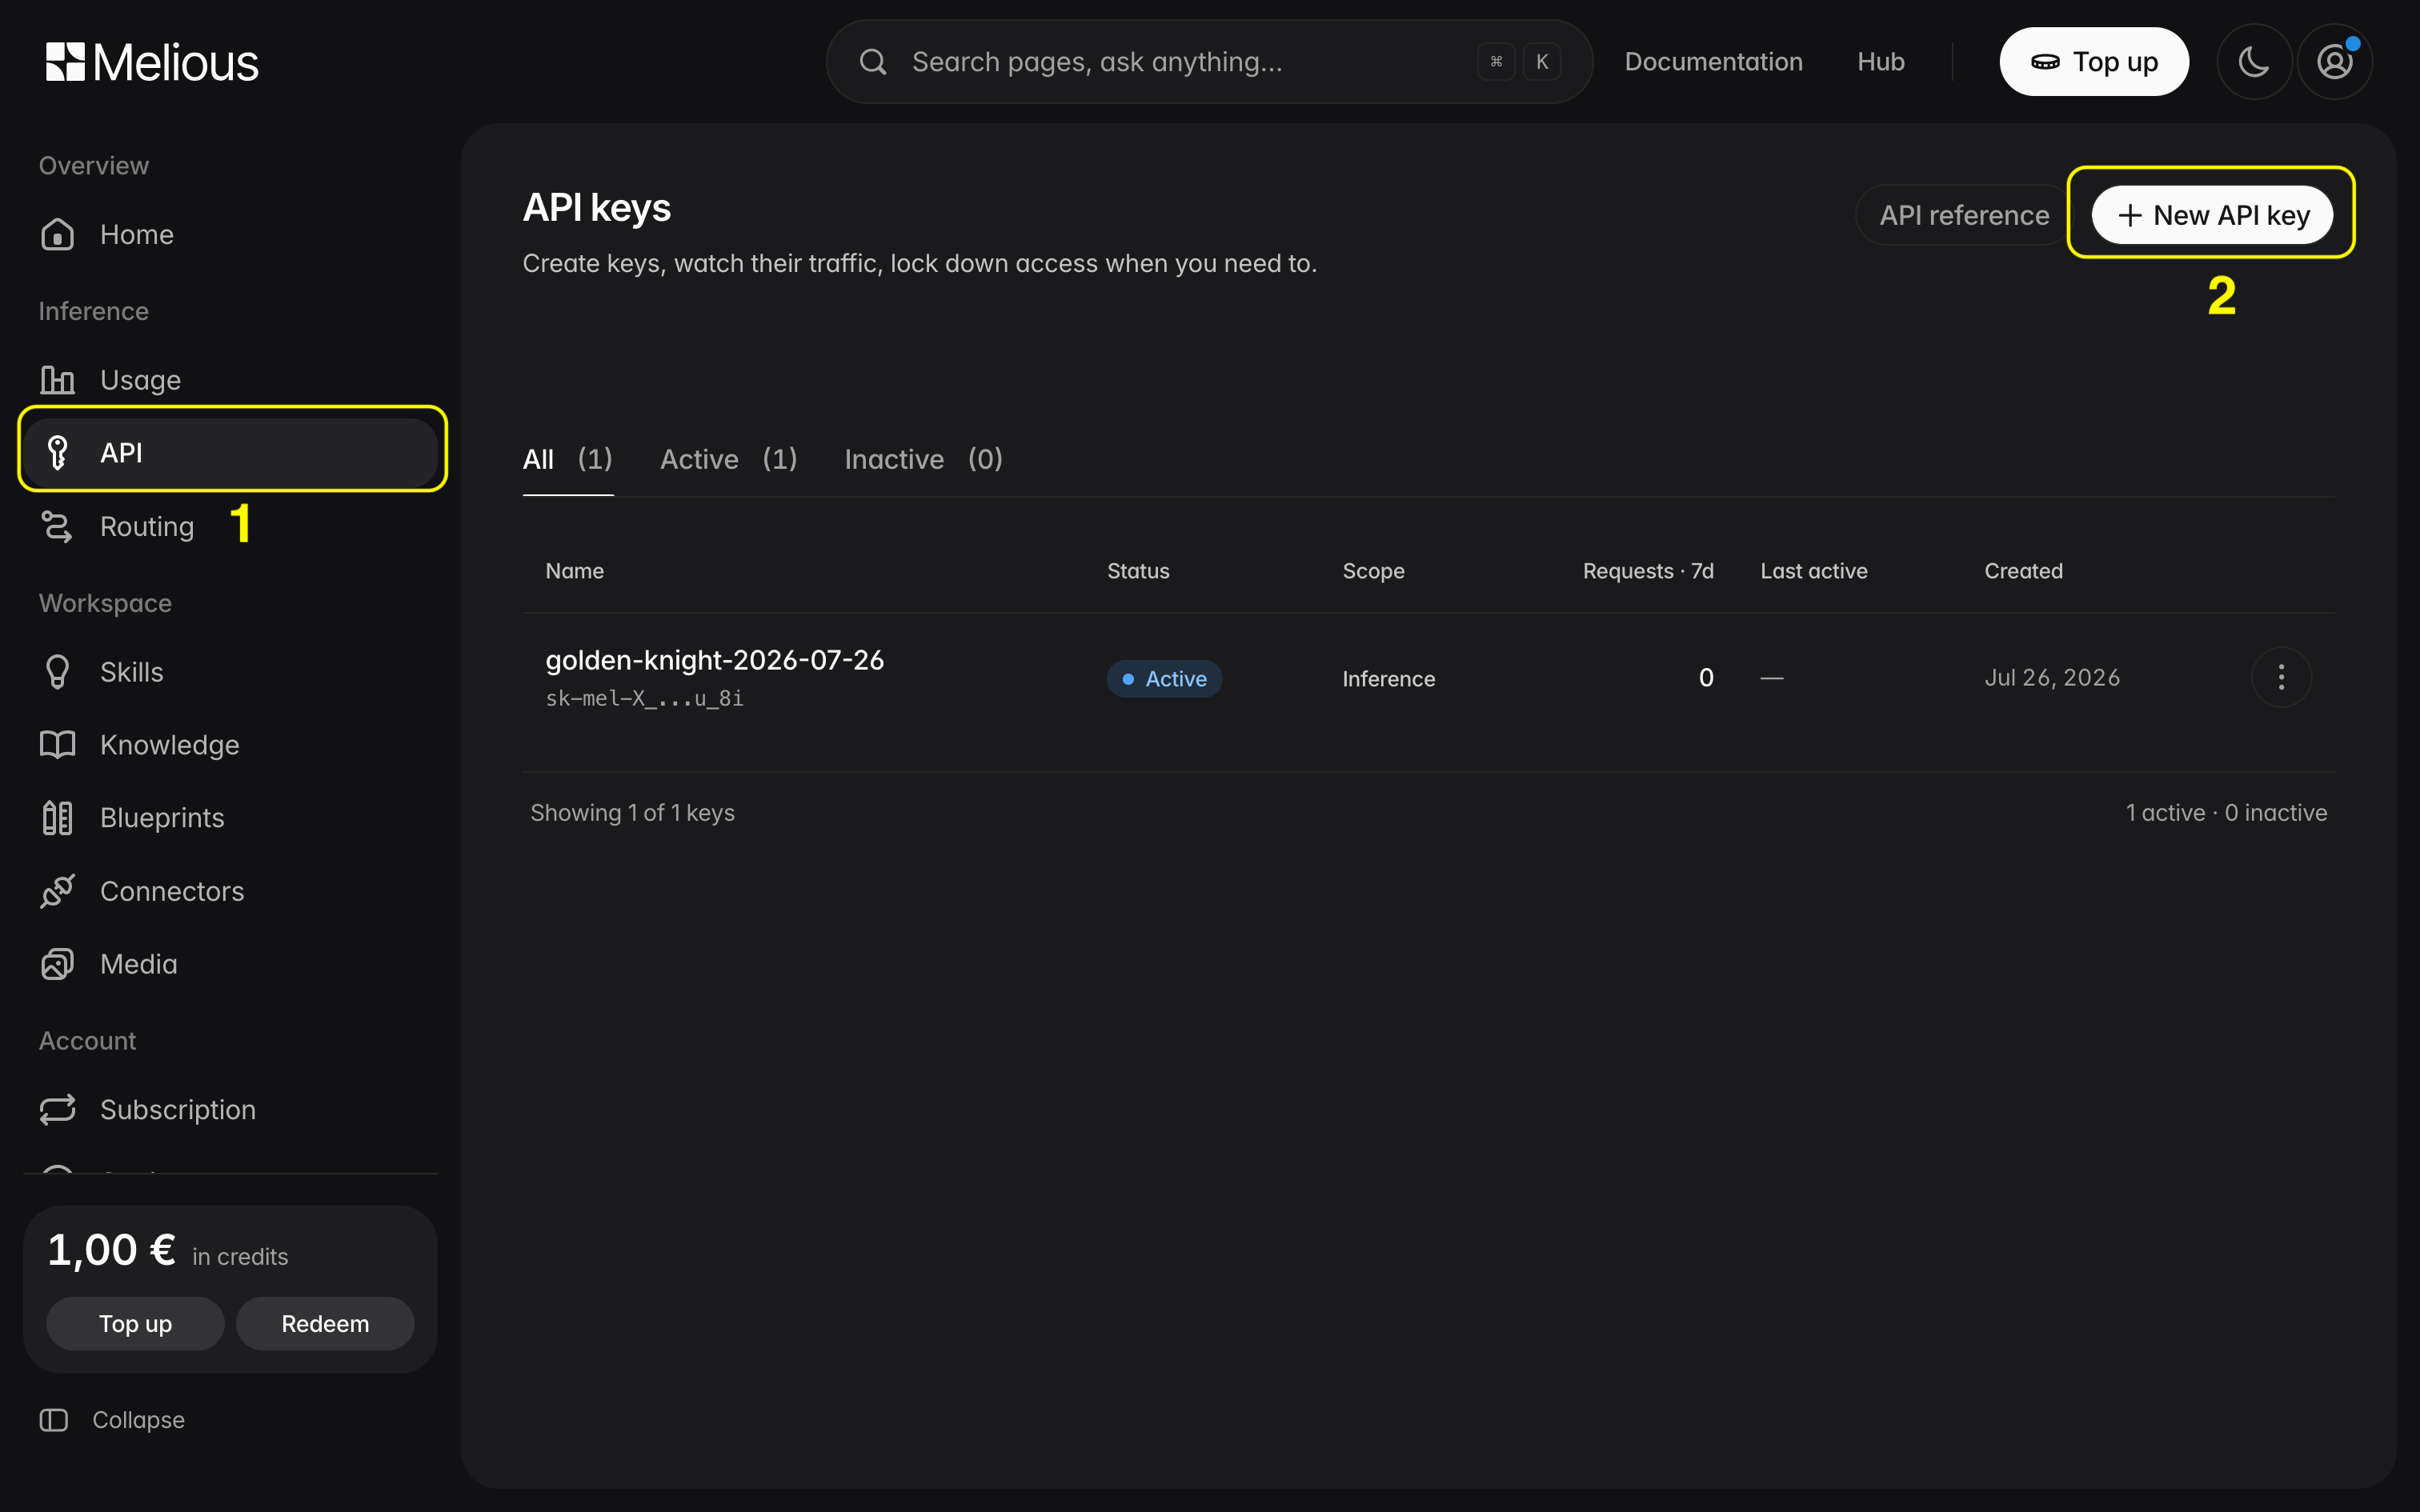
Go to API → New API key. Copy the key immediately and save it in your password manager; Melious displays it once. See the Melious quickstart.
Open the model catalog, confirm that glm-5.2 is available to your account, and check its tool-calling support and context limit. Melious recommends this model for tool use in its n8n workflow-node guide. We'll use it as a starting point for the assistant and verify a full build in Step 8. If you choose another model, use its exact API identifier below.
The base URL for this connection is https://api.melious.ai/v1. n8n connects directly to it, so you don't need to install an SDK or a community node for the assistant. The custom endpoint is configured separately from model credentials used inside individual workflows.
7. Turn on AI Assistant
Return to your n8n service in Sliplane and open its environment variables. Add the following block, replacing all three REPLACE_WITH_... values:
N8N_ENABLED_MODULES=instance-ai

N8N_INSTANCE_AI_MODEL=glm-5.2
N8N_INSTANCE_AI_MODEL_URL=https://api.melious.ai/v1
N8N_INSTANCE_AI_MODEL_API_KEY=REPLACE_WITH_MELIOUS_API_KEY

N8N_INSTANCE_AI_SANDBOX_ENABLED=true
N8N_INSTANCE_AI_SANDBOX_PROVIDER=daytona
N8N_INSTANCE_AI_SANDBOX_IMAGE=daytonaio/sandbox:0.5.3-slim

DAYTONA_API_URL=https://app.daytona.io/api
DAYTONA_API_KEY=REPLACE_WITH_DAYTONA_API_KEY

INSTANCE_AI_BRAVE_SEARCH_API_KEY=REPLACE_WITH_BRAVE_SEARCH_API_KEY
Mark the three API keys as secrets. If entering variables individually, the text before = is the name and the text after it is the value. Keep your existing database and public URL settings.
The sandbox settings follow n8n's documented Daytona configuration. The model settings combine n8n's custom endpoint support with the Melious API base URL.
With N8N_INSTANCE_AI_MODEL_URL set, use the model ID expected by Melious, such as glm-5.2. Keep /v1 in the base URL; the client appends the endpoint path.
Check these details before saving:
INSTANCE_AI_BRAVE_SEARCH_API_KEYhas noN8N_prefix.- If
N8N_ENABLED_MODULESalready contains other modules, addinstance-aito that comma-separated list. N8N_DISABLED_MODULES, if present, must not disableinstance-ai.
You can configure provider connections in n8n's AI settings too. For this tutorial, keep the configuration in Sliplane; an existing provider selection in the n8n UI can take precedence over environment values. See n8n's provider configuration.
Save the settings and click Save and redeploy. Wait for the deployment to finish, then reload n8n.
8. Test the assistant, sandbox, and search separately
Open AI Assistant in n8n and start with a workflow that doesn't need external credentials:
Create a workflow with a Manual Trigger and an Edit Fields node. Add a field named message with the value "Hello from my self-hosted n8n assistant". Save it without publishing it. Do not use a Code node.
Inspect the generated workflow and run it manually. The output should contain your message field with that exact value.
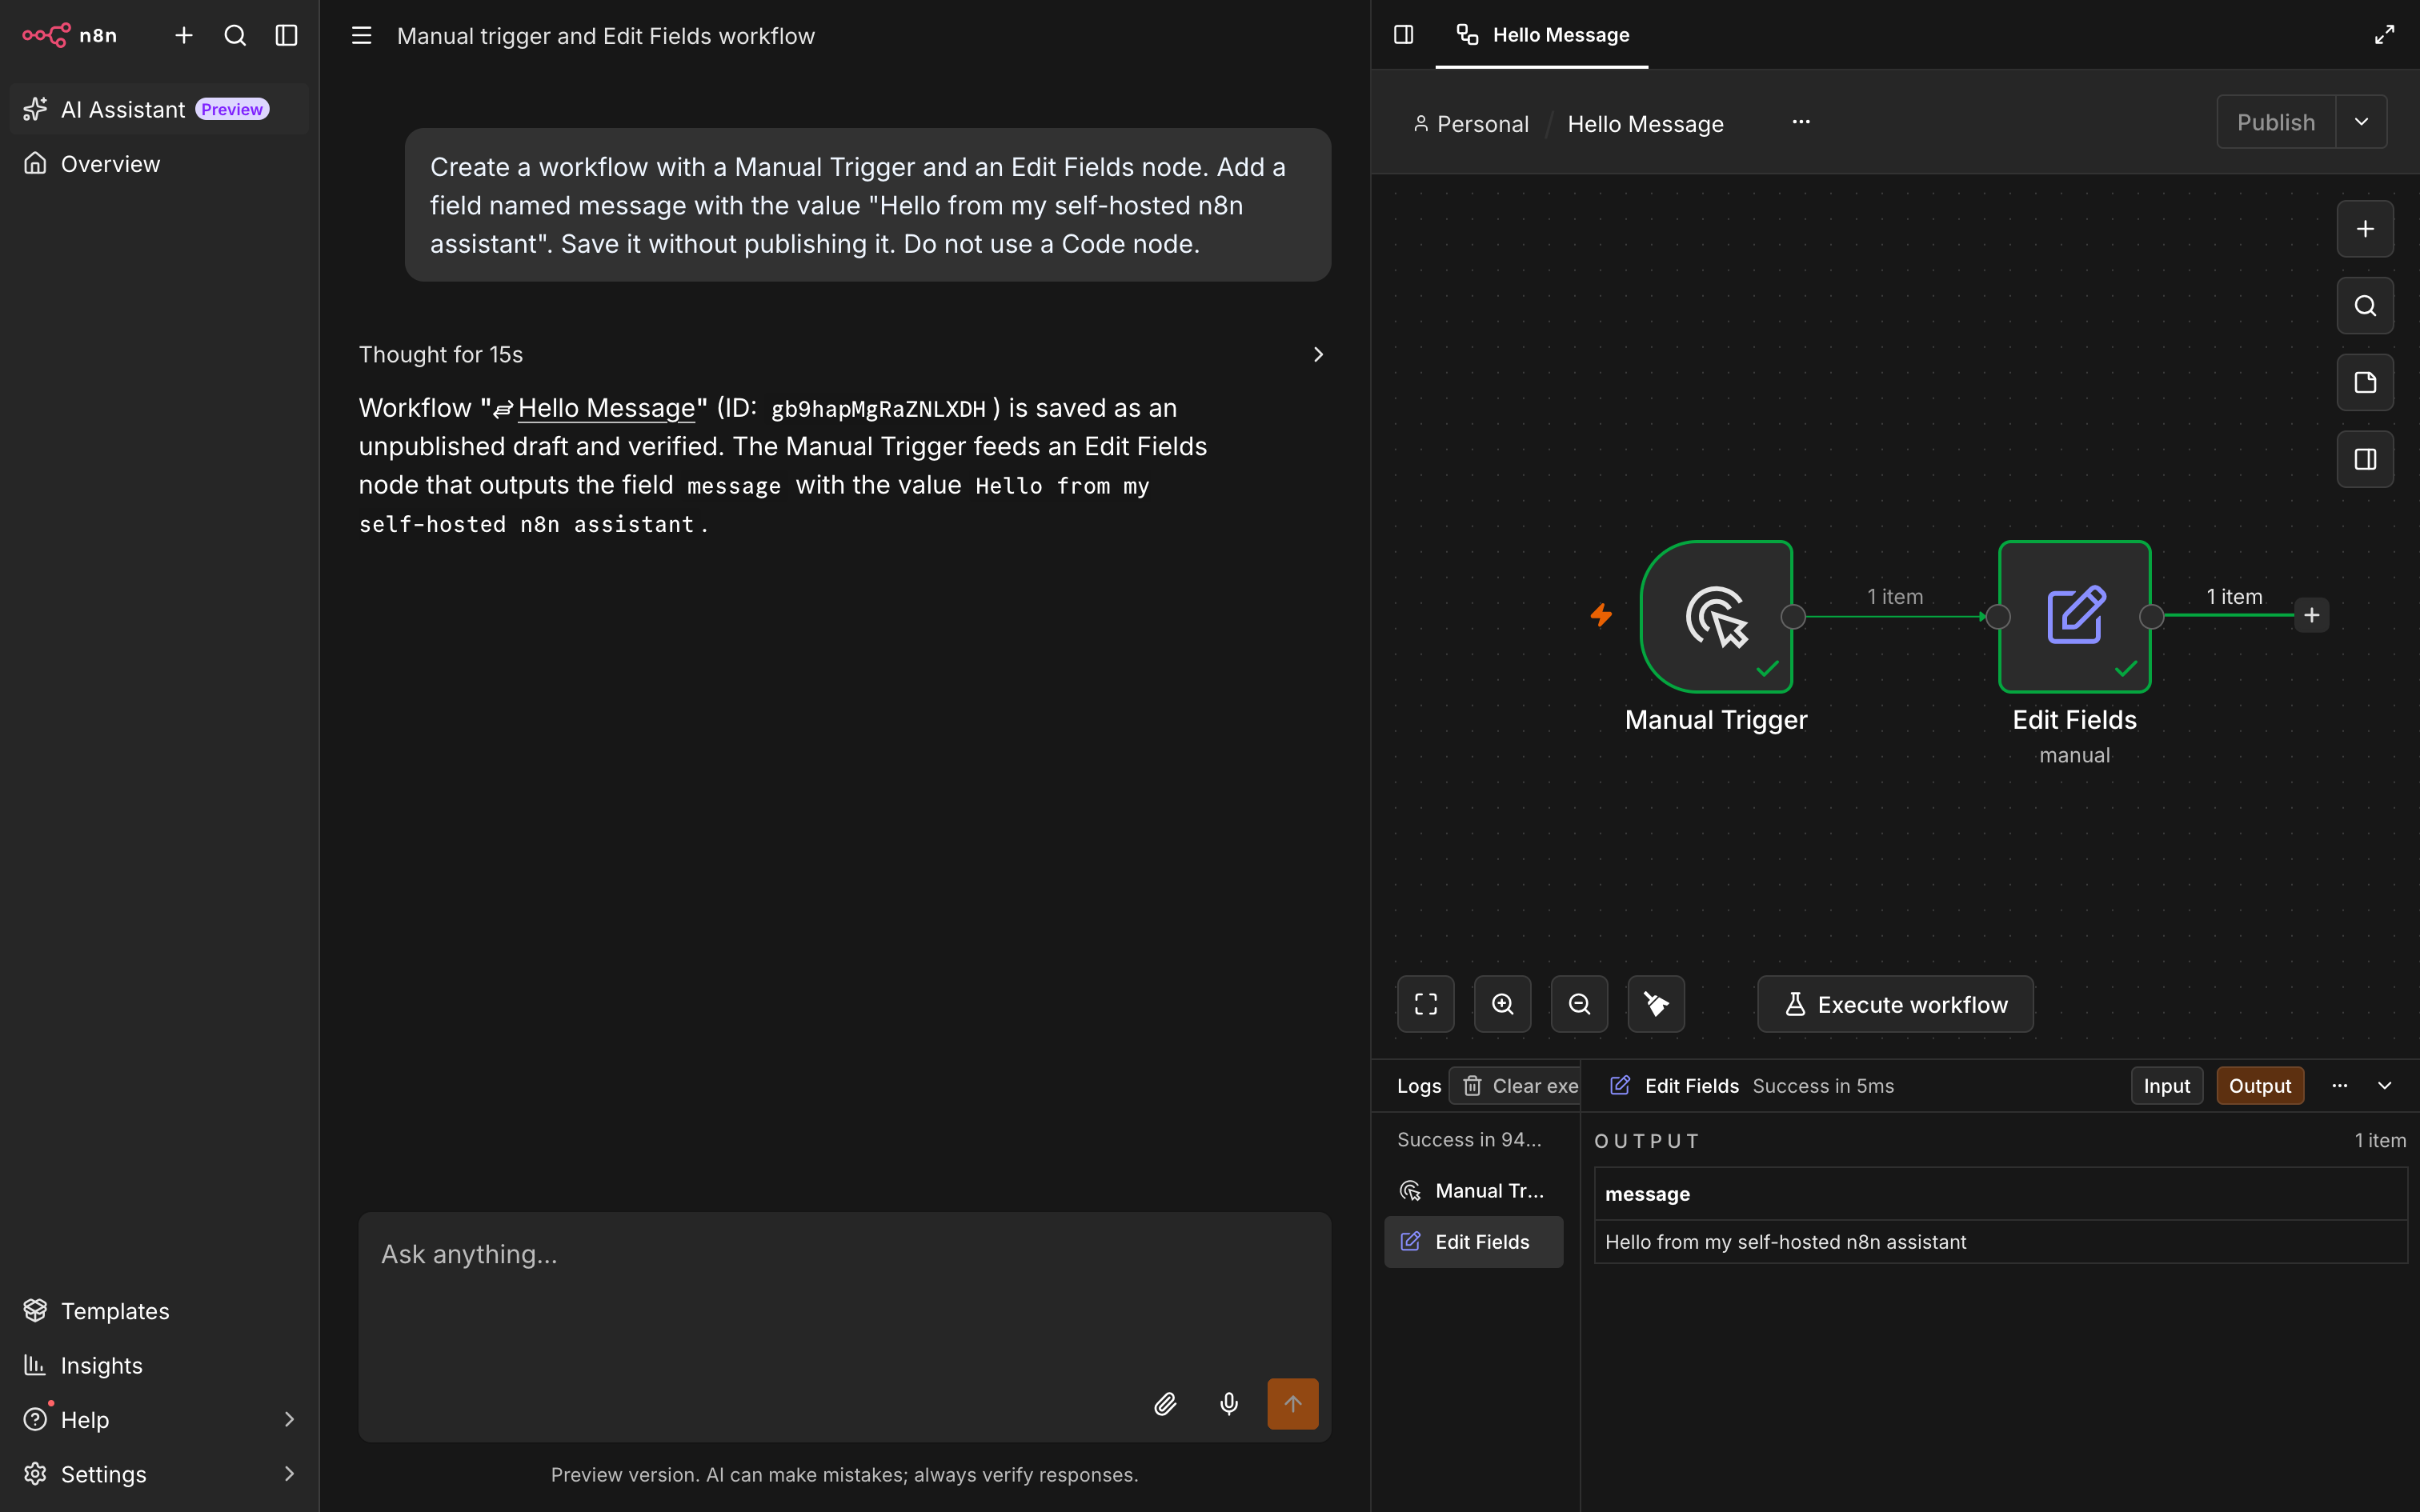
During generation, check Daytona's sandbox list for activity. Some sandboxes are temporary, so a completed build may already have cleaned up its workspace. If the builder fails, inspect the n8n service logs and Daytona's sandbox details together.
Then test search in a separate message:
Search the web for the official Brave Search API pricing page. Give me the source URL and the current price per 1,000 Search requests. Use web search for this answer.
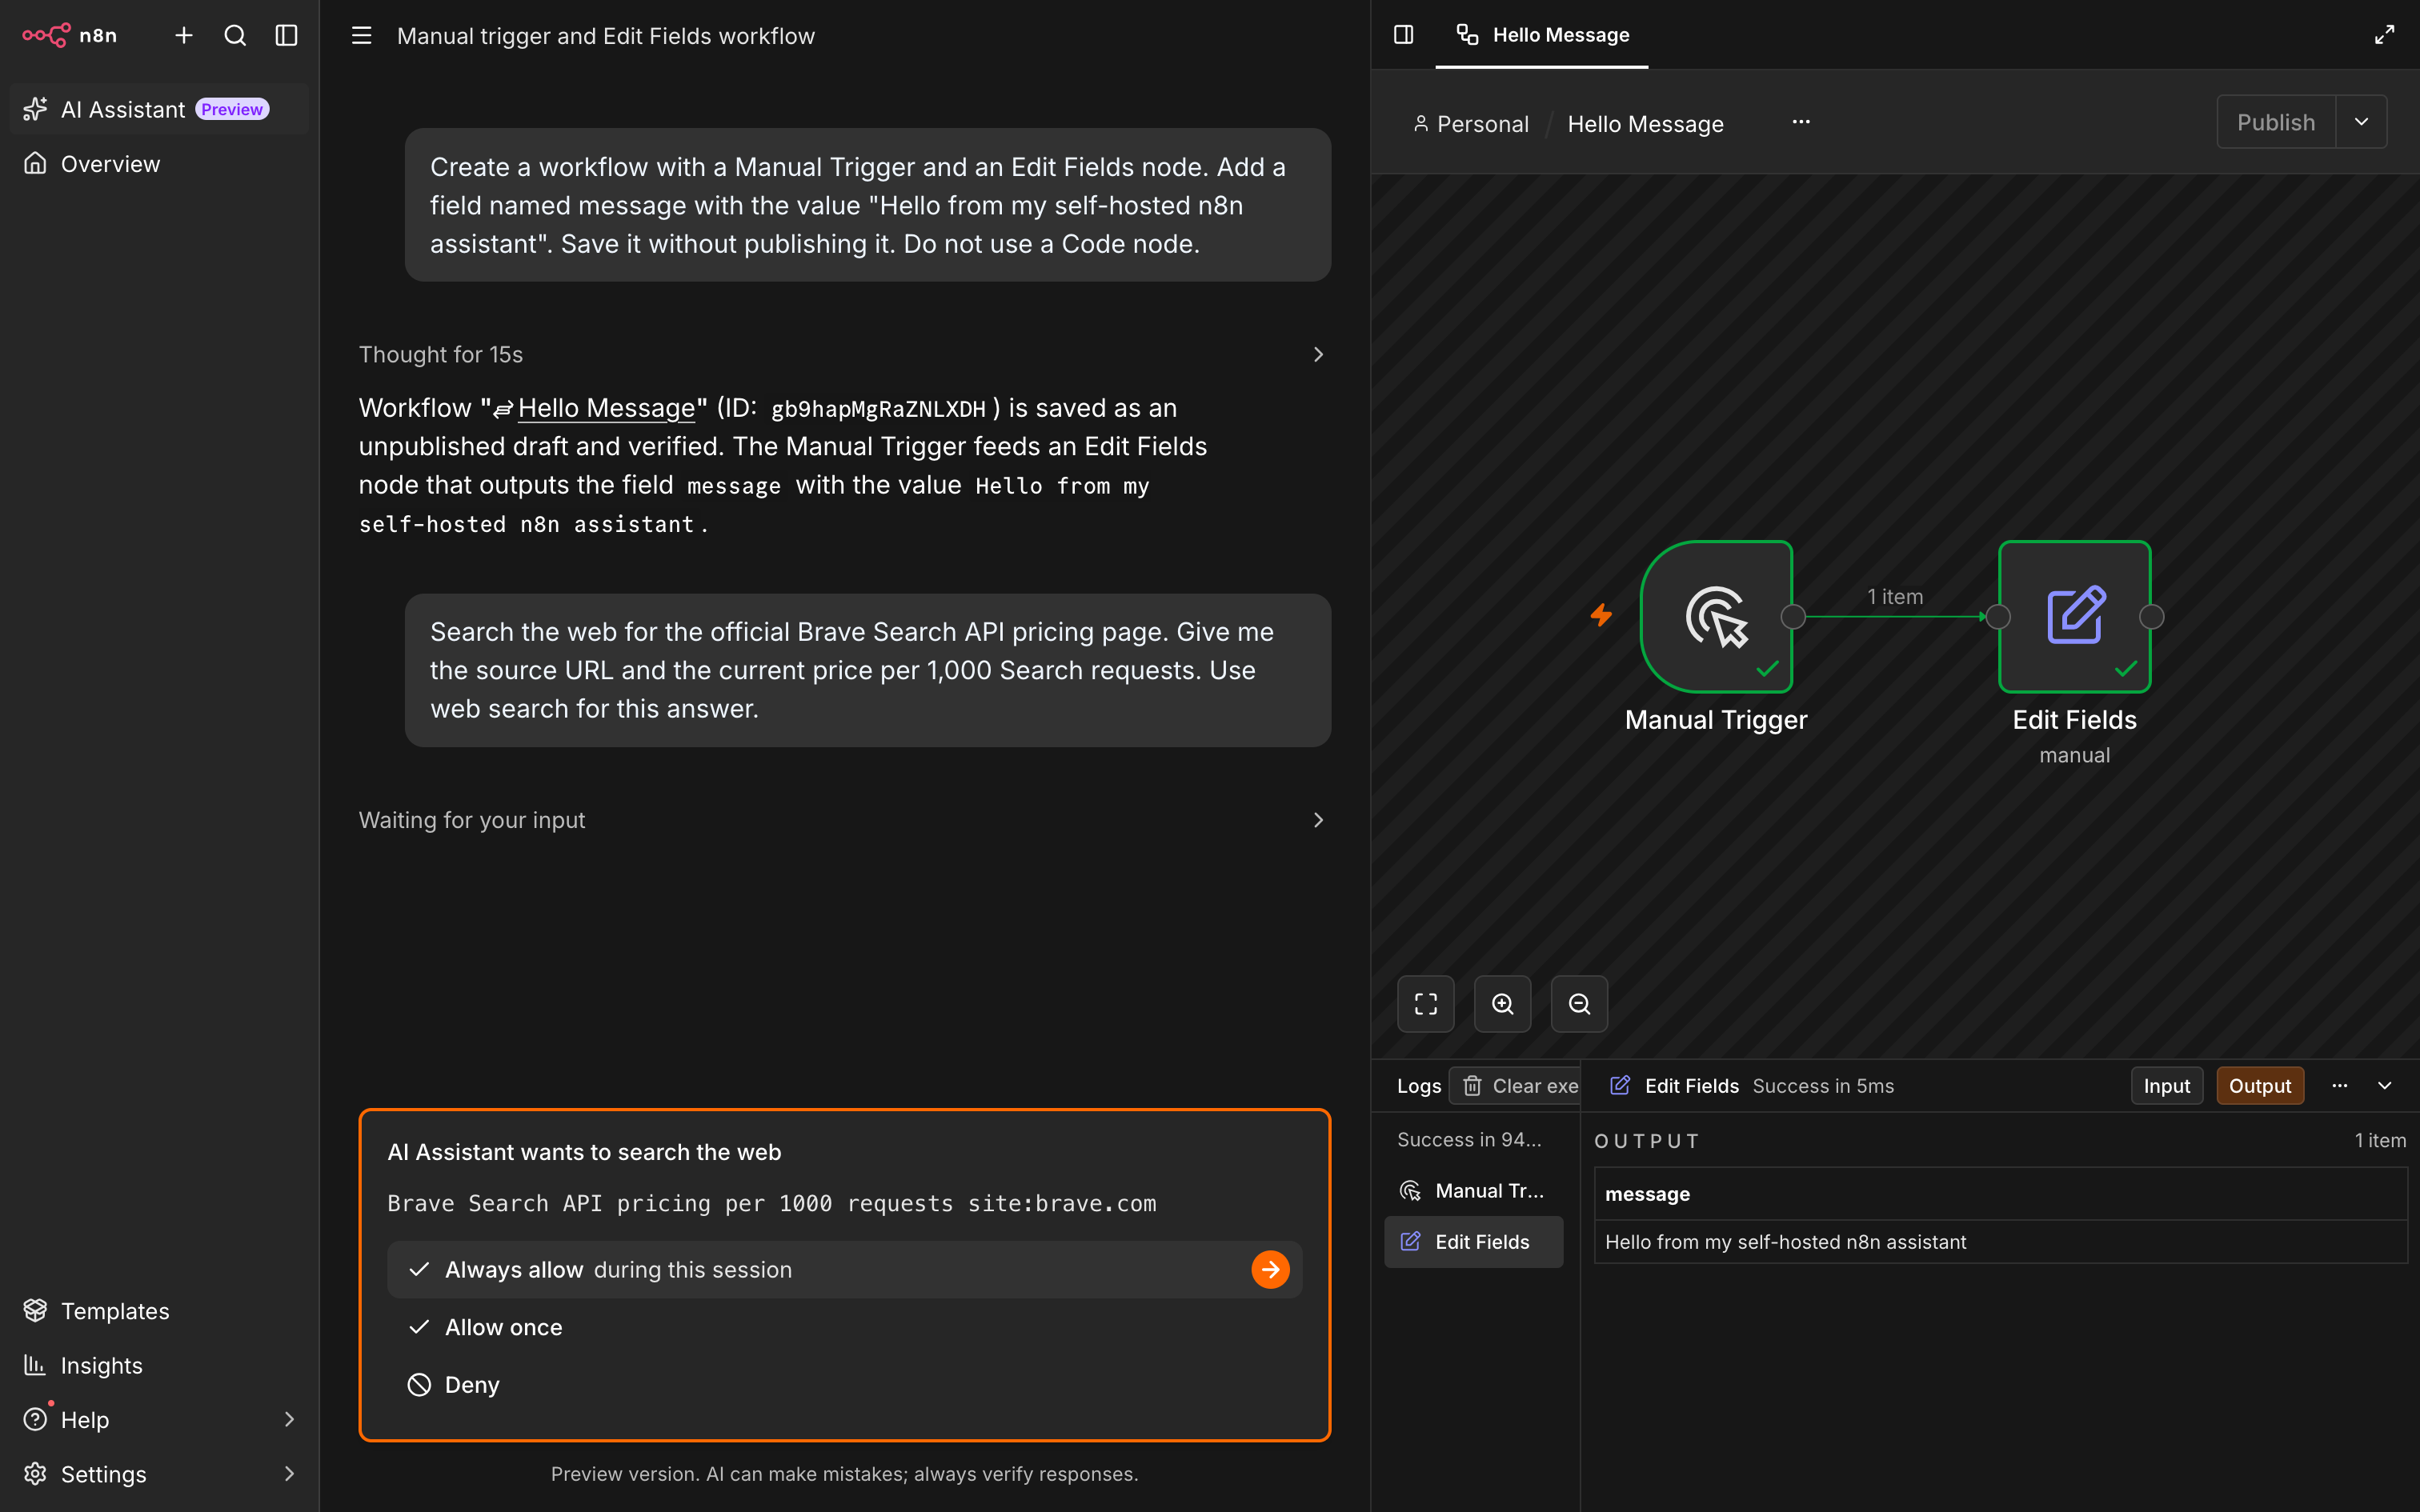
Look for a search tool call in the assistant's activity, then check Brave's usage dashboard after it updates. A plausible answer alone doesn't confirm that the search API was called.
Finally, redeploy n8n once more and reopen your saved test workflow. It should still exist, and your login should still work. This checks that your data survives a container replacement.
These checks should confirm three results: a workflow survives redeployment, the assistant builds through a Daytona sandbox, and a search appears in Brave's API usage. Repeat the build with a few representative workflows and keep them for checking future n8n and model updates. The stack selection article explains what to measure when evaluating the model.
9. Verify recovery and ongoing operation
Open your managed database's Backups tab and check the recovery window. Sliplane currently retains seven days of backups and supports point-in-time recovery. A restore creates a separate, billable database, which lets you verify the recovered data before switching n8n to it. See managed database backups.
Keep the original n8n encryption key and back up the /home/node/.n8n volume too. To test recovery, restore PostgreSQL to a new database and connect an isolated n8n instance using the same encryption key. Prevent that recovery instance from running production triggers or contacting real services while you inspect the recovered workflows and credentials. See our n8n backup and update guidance.
Leave Daytona's idle cleanup enabled. n8n exposes the following lifecycle settings, with these defaults:
N8N_INSTANCE_AI_SANDBOX_AUTO_STOP_MINUTES=15
N8N_INSTANCE_AI_SANDBOX_AUTO_ARCHIVE_MINUTES=60
N8N_INSTANCE_AI_SANDBOX_AUTO_DELETE_MINUTES=10080
You don't need to add these unless you want to make the defaults explicit. They control idle stopping, archiving, and eventual deletion. Check n8n's sandbox configuration before changing them. Stopped sandboxes can still incur storage charges; Daytona explains the lifecycle-dependent charges in its billing guide.
Set usage alerts for the external services and schedule key rotation before your Daytona key expires. Keep n8n's image pinned, review release notes before upgrading, and rerun your test workflows after each update. Change the model and n8n version separately so you can identify which change affected the results.
Check application health separately from assistant health. A model or search outage may stop a new build, while an existing workflow with no dependency on that provider can continue. Workflows that call the same external API need their own failure handling. Decide who checks failed executions and who owns each provider account before handing the instance to a team.
When you build a real automation, connect its service credentials yourself, inspect the generated nodes, and test with sample data before publishing. For workflows that send messages or change records, verify the recipients and target records as part of that test.
Troubleshooting
| Symptom | What to check |
|---|---|
| n8n fails to start | Check the Sliplane logs. Confirm the managed database is ready, the app server's outbound IP is allowed, and all five connection fields match the dashboard. |
| PostgreSQL reports a TLS or certificate error | Check DB_POSTGRESDB_SSL_CA for the complete certificate and preserved line breaks. Confirm that the host is the database's hostname. Keep certificate verification enabled. |
| AI Assistant is missing | Check the n8n version, N8N_ENABLED_MODULES, and N8N_DISABLED_MODULES. Redeploy after editing variables. |
| The assistant reports a model error | Check the Melious model ID, N8N_INSTANCE_AI_MODEL_URL, API key, model access, and inference balance. |
| The assistant replies but fails to build workflows | Inspect tool-call and context-limit errors. Recheck the selected Melious model's capabilities and rerun the simple build test. |
| Workflow generation fails at the sandbox step | Check the Daytona endpoint, key permissions, expiration, wallet balance, and resource quota. |
| A sandbox cannot reach a website | Check Daytona's tier-based network restrictions. Lower tiers restrict outbound access even when the sandbox has a valid API key. |
| Web search fails | Check the exact Brave variable name, whether the key belongs to an active Search plan, and the remaining credit. |
| Webhooks show the wrong address | Check WEBHOOK_URL and the public hostname. Use the production webhook URL when the workflow is published. |
| n8n asks you to create an owner again after a redeploy | Check whether the database settings changed or point to a fresh database. Preserve the existing database and volumes while investigating. |
For sandbox connectivity, refer to Daytona's network restrictions. Keep service logs free of copied API keys when sharing an error for support.
Next steps
Build one useful workflow, connect its credentials, and run it against sample data before publishing it. Keep the successful test alongside your recovery notes and deployed n8n version.
As usage grows, revisit the production stack and cost breakdown to review server sizing, model quality, and API budgets. Our n8n operations guide covers the ongoing backup and update work.